18 tips on optimising your product feed
E-commerce businesses running PPC advertising often find that a Shopping campaign is the best performing campaign type within their Google Ads account.
This is not surprising as a Shopping campaign ad shows the customer more information about the specific product you’re selling than a Search campaign. It includes a picture of the product, the price, and some information about what the product is.
The user is also actively searching for a product like the advertiser’s product. This means their intent is higher than what you would get with a video or display campaign, for example.
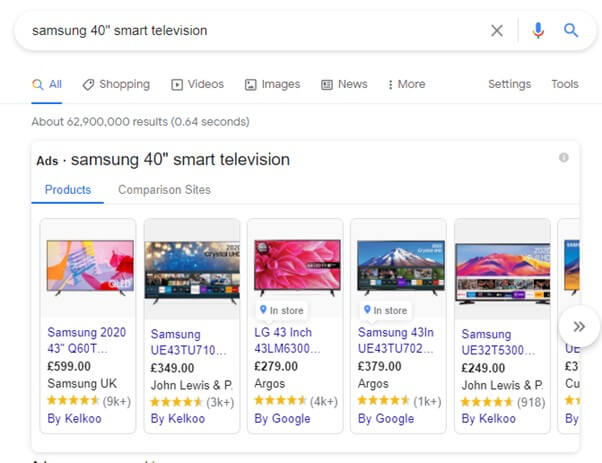
When it comes to optimising a Shopping campaign, one of the areas often overlooked is optimising the product feed.
Optimising the product feed will put Google in the best position to be able to show your ads on the most relevant searches.

In this blog, we will give eighteen tips on how you can get more from your shopping campaigns by optimising your product feed.
Tip 1: Check for spelling mistakes
Let’s start with the basics. Spelling mistakes in your feed look sloppy and can be embarrassing if your customer sees them.
Look through your product title and product descriptions for spelling mistakes.
Tip 2: Keep an eye on character lengths
Your product titles and product descriptions have a maximum character length. Make sure you use the space available to you by adding in relevant keywords and product features.
The maximum character length for your product title is 150 characters. However, Google recommends that your product titles are no longer than 70 characters.
Tip 3: Include a google product category
The Google Product Category is an optional attribute that advertisers can add to their product feed to give Google more information about your products.
The more information Google has on your products, the better it can match your products to the right searches.
Have a look at Google’s product taxonomy to get a list of the Google Product Categories that you can choose.
Bear in mind that not all your products need to have the same Google Product Category. Make sure each product has the most granular and relevant Google Product Category.
Tip 4: Include a product type
The Product Type attribute is another attribute that can be used to give Google more information about your products.
Unlike the Google Product Category, the Product Type attribute contains information created by the user. There is not a pre-defined list of options to choose from like with the Google Product Category attribute.
The Product Type attribute contains grouping information segmented by the ‘>’ symbol. So, for example, if you are selling red leather jeans, then you may decide to put the following in your Product Type attribute:
Clothes > Jeans > Leather > Red
Tip 5: Deal with ‘disapproved’ products
Optimising your feed is one thing, but if your product is disapproved, then it will not show up at all. Investigating why products have been disapproved and fixing the issue will help increase your traffic and hopefully revenue.
To see which products have been disapproved, click on the ‘Products’ tab on the left-hand side and then on ‘Diagnostics’.
On the bottom of the page, you will see a list of reasons why some of your products have been disapproved. If you see a red circle with an exclamation mark inside the’ Issue’ section, then this means that you have product disapprovals.
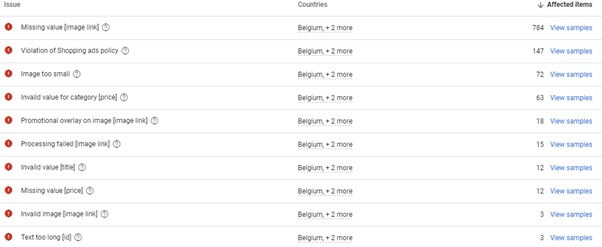
To get more information on how to fix the disapproval, hover over the question mark next to the disapproval. This will give you more details on what you need to do to get your product approved.

Lastly, click on the’ View Samples’ link to download a sample of the products that have been disapproved.
Tip 6: Deal with ‘limited’ products
Like dealing with disapproved products, you can look at your products that are limited for some reason. These can be found within the ‘Diagnostics’ tab and have a yellow triangle with an exclamation mark to the left of them.
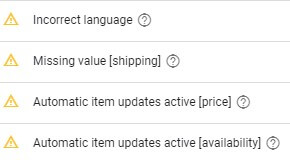
These are products that still show on Google’s shopping listings but would see an improvement in performance by fixing the issue.
Tip 7: Get free Google Shopping traffic
On April the 21st of 2020, Google announced that they would offer a free Google Shopping option to businesses.
This allows businesses to get a small amount of free Shopping traffic in addition to the Shopping traffic that they would need to pay for.
Free Shopping traffic can appear on the ‘Shopping’ tab on the Google search results page. You can spot paid and free listings because the paid-for listings will mention ‘Sponsored’ on the top right.
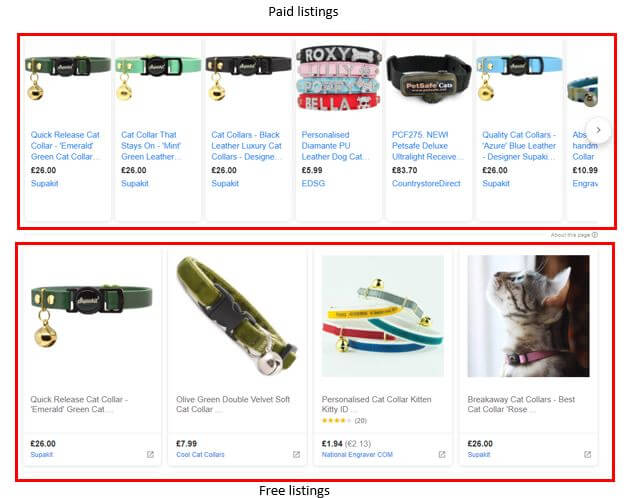
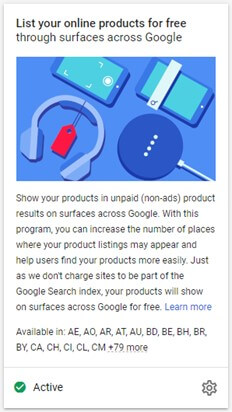
To start getting free Google Shopping traffic, you need to activate ‘Surfaces Across Google’. You can do this by clicking on ‘Growth’ on the left-hand menu and then on ‘Manage Programmes’.
Tip 8: Use a CSS provider
Google allows advertisers to use a CSS provider to submit their products on Google’s shopping results page. Advertisers using a CSS feed benefit from 20% cheaper click prices.
This means that advertisers using a CSS feed can achieve a higher impression share or a better position on the page without increasing their bids.
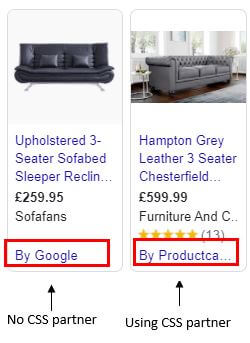
Nothing really changes when you use a CSS partner. You still use Google Merchant Centre, and your Shopping campaigns are still within Google Ads. The main thing that changes is that the CSS partner’s name will appear underneath your Shopping listings instead of Google.
There are many CSS providers that you can choose from. You will need to find one with a price point that is right for you.
A good place to start when it comes to finding a CSS partner is to look at Google’s CSS partners page.
Tip 9: Add keywords in titles and descriptions
Google uses the words in your product titles and descriptions to understand what your product is about.
This helps it to match your products with the most relevant searches. If you add relevant keywords in your product title and descriptions, then there is a better chance that Google will match your products to the most relevant searches.
To identify the right keywords to put in your product titles and descriptions, think about your product, and what kind of people would be searching for it.
Use the Google keyword planner to identify relevant keywords to add to your product feed. If you are currently running a Shopping campaign, take a look at your search query report to see what kind of things your customers are searching for and try to add them to your product title or product description.
While adding keywords to your product titles and product descriptions, it is important that they still read well and are written with the user in mind.
Tip 10: Make use of Merchant promotions
If you have a sale running or are offering a discount, you can use this in your Shopping campaigns. You can advertise any offers you are running on your Shopping product listings and increase your clickthrough rate.
Examples of what you can advertise are discount codes, free gifts with every purchase and a buy one get one free offer.
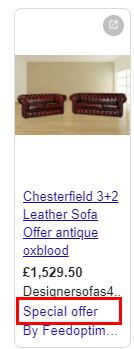
Once the Special Offer text is clicked, it will open a window that gives more information about the special offer.
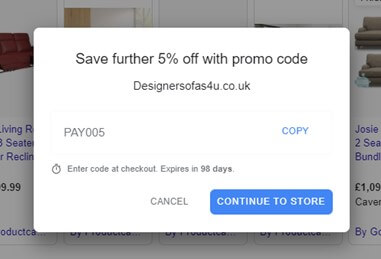
In your Google Merchant Centre, click on ‘Marketing’ and then on ‘Promotions’ to create a promotion on your Shopping listings. Here you will be able to follow the steps and create the specific promotion that you are offering.
Tip 11: Segment products with Custom labels
Custom Labels are optional attributes that you can add to your product feed. They can be used to segment your campaigns further to meet your business goals.
Each product feed can have up to five custom labels. In your product feed, these are called:
- custom_label_0
- custom_label_1
- custom_label_2
- custom_label_3
- custom_label_4
There are many ways that you could use custom labels to segment your products and improve your Shopping campaigns. Here is just a handful of examples:
- High/low-profit margin – Target a different ROAS (Return on Ad Spend) based on your products’ profitability.
- Best/worst sellers – Switch off worst sellers when the budget is low.
- Bestsellers by season – Know which products to push based on the season.
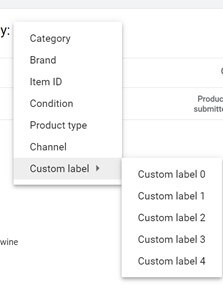
Once you have added your custom labels into your product feed, you can start using them in your Shopping campaigns. To segment your products by their custom labels, click on the plus symbol next to All Products.

This will open a window where you can choose how you want to subdivide your products. You can segment your products by Category, Brand, Item ID, Condition, Product Type, Channel and Custom Label. Select the Custom Label option and segment your products by the relevant Custom Label.
Tip 12: Use high-quality images
Shopping campaigns are highly visual. The image is probably the first thing that the user will notice when they see your shopping listing.
Therefore, it is important to use high-quality images in your Shopping ads to make your products look appealing.
Google recommends that you use images that are at least 100×100 pixels for non-apparel products. For apparel products, Google recommends that you use images that are at least 250×250 pixels.
Tip 13: Make images different to the competition
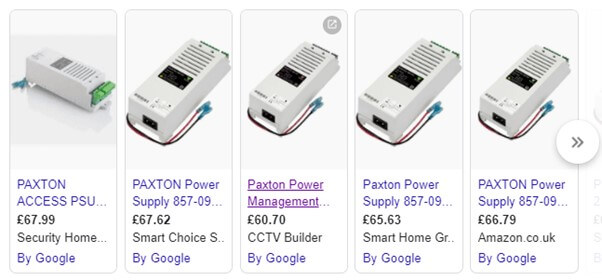
As mentioned in the previous suggestion, the image is probably the first thing that the user will see when they look at your shopping listing.
If all the competitors are using the same product image, your listing will look like everyone else. In this case, it may be beneficial to test using a different image. Not only could this help to differentiate your listing to the others, but it could also increase your clickthrough rate.
Tip 14: Test lifestyle images
Think about the type of niche that you are in and test an image that matches your niche. It may be that a lifestyle image with someone using or wearing your product works better than a standard stock image.
This could help to differentiate your shopping listing from the competitor and increase your clickthrough rate.
Tip 15: Add more than one product image
Google allows advertisers to add more than one product image into the product feed. These additional images can appear in your listings and are used to show your product from a different angle.
Advertisers can add the extra image to the additional_image_link attribute within their product feed. Click here to read more on the additional image link attribute.
Tip 16: Add as many optional attributes as possible
Google Merchant Centre has several mandatory attributes. Your products will be disapproved if your product feed does not contain any information in some attributes.
In addition to the mandatory attributes, Google Merchant Centre also support several optional attributes. You can still run Shopping campaigns without adding any information in these optional attributes.
However, to improve the quality of your product feed and to give Google as much information about your products as possible, it is best practice to fill in as many optional attributes as possible.
There are several optional attributes that you can fill in. Not all of them will be relevant to your business. You can see a full list of optional and required attributes on Google’s Product Data Specification page.
Here are just some of the optional attributes that you could choose to fill in:
- additional_image_link [additional_image_link]
- mobile_link [mobile_link]
- availability_date [availability_date]
- cost_of_goods_sold
- expiration_date [expiration_date]
- sale_price [sale_price]
- sale_price_effective_date [sale_price_effective_date]
- unit_pricing_measure [unit_pricing_measure]
- unit_pricing_base_measure [unit_pricing_base_measure]
- instalment [instalment]
- subscription_cost
- loyalty_points [loyalty_points]
- google_product_category [google_product_category]
Tip 17: Implement a Shopping campaign on Bing
If Google Shopping is working well for you and you want more, then why not consider running a shopping campaign on Bing? The best part is that you can use the same feed on Google Merchant Centre.
The interface on Microsoft Advertising and the general process to create a Shopping campaign is very similar to Google Ads. This means if you are comfortable with using Google Ads, you’ll most likely be comfortable using Microsoft Advertising.
To run a Shopping campaign on Bing, you will need a Microsoft Advertising account. Once you have created this, you will need to create a Microsoft Advertising Merchant centre account.
You can do this by clicking on Merchant Centre on the top of Microsoft Advertising:

Once you’ve created a Microsoft Advertising Merchant Centre account, you will need to get your product feed into Microsoft Advertising Merchant Centre.
Here are four ways to do this:
- Automatically download the file from URL
- Upload file using FTP
- Manually upload file
- Import from Google Merchant Centre
If you are already running a Shopping campaign on Google Ads, then the easiest way is to sync up your Google Merchant Centre account with your Microsoft Merchant Centre account.
Once you’ve created a Microsoft Advertising Merchant Centre account and synced up a product feed, the rest of the process is very similar to Google Ads.
Tip 18: Front-load your best keywords in the product title
It is recommended that you put as many relevant keywords in your product titles as you can without going over the character limit.
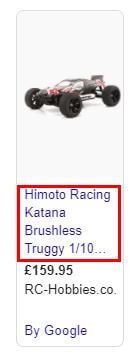
However, even if you do not go over the character limit, there is a chance that your product title will be truncated.
Therefore, it is a good idea to put the words that you think will resonate the best with your customers at the start of your product title. This will increase the chances of those words being displayed and not truncated on your Shopping ads.
Wrapping up
If you’re running a Shopping campaign on either the Google Ads or the Microsoft Advertising platforms, then don’t neglect your product feed.
Use these eighteen suggestions to optimise your product feed and get more out of your Shopping campaign budget.