How to install the Facebook Ads pixel [New Interface]
If you are running paid Facebook ads or are considering running a Facebook PPC campaign, you need to use the Facebook pixel.
The Facebook pixel is a basic best practice when it comes paid Facebook advertising. However, there are still some advertisers not using it.
Facebook has updated its interface, and some things have moved around. In this guide, I’ll be giving instructions using the new version of the Facebook interface.
Keep reading to discover more about the five main areas you should know about regarding the Facebook pixel.
What is a Facebook Pixel?
The Facebook pixel is a short piece of code that Facebook can generate for you for free. You don’t need to have any coding skills. It is Facebook’s way of tracking who and how people are interacting with your website.
One Facebook pixel is allowed per website unless you have a business manager account. In this case, Facebook allows up to 100 pixels to be created.
You can ‘train’ your pixel to give a better understanding of who your customers are. This should lead to an improvement in your Facebook advertising performance.
So, when you first start paid advertising on Facebook, the performance might be quite poor. It should then gradually improve as your pixel begins to learn more about your best audience.
When you send traffic to your website, your Facebook pixel looks at the kind of traffic coming to your site and the kind of traffic that is converting. It can then create better Lookalike audiences using this data.
Even if you’re not currently using Facebook advertising, it is a good idea to implement the pixel on your site. This is because once implemented; it will start building up data on your users.
This means if you do decide to start advertising on Facebook, it will already have learnt quite a bit about your users.
Three functions of the Facebook Pixel
There are three functions of the Facebook pixel: tracking conversions, optimising ads, and retargeting ads.
Below I have put together information and benefits on all three functions.
Track conversions
The first benefit of using the Facebook pixel is that it allows you to start tracking conversions on your website.
A conversion may be a sale, lead or email signup, to name a few examples. It is a completed action that you want someone to take on your website.
Without a Facebook pixel, you can still track Facebook metrics such as likes and the number of people engaging with your site.
These metrics can be beneficial to help optimise your Facebook advertising somewhat. However, without seeing the number of sales or leads you are getting from each Facebook campaign, your optimisation efforts can only go so far.
Optimise ads
The second benefit follows on from the first benefit. It shows you the value of your Facebook advertising.
You can then start looking at your CPA (Cost Per Acquisition) to determine if your advertising efforts are profitable or not.
Once you know which ads and audiences are profitable, you can start thinking about where you want to invest more of your budget and where you want to invest less budget.
You’ll be able to add a revenue figure to your reports and determine whether paid Facebook advertising is right for you or not.
Create retargeting ads
You can create a retargeting ad campaign. This is when you re-engage with people who have already visited your website but perhaps did not complete a conversion action.
In many accounts, a retargeting campaign is the best performing paid Facebook advertising campaign.
When someone visits your website, they trigger the Facebook pixel, which then feeds the information back to Facebook. Use your pixel to target people who took a specific action on your website.
Here are a handful of website actions that you can choose to target in your retargeting campaign:
- When a user added a product to the cart but did not complete the purchase.
- When a user subscribed to an email list.
- When a user downloaded a free trial.
- When a user searched for something on your website.
- When a user has read a post on your blog.
Create lookalike audiences
The data collected by the Facebook pixel can be used to create lists of people who are like those interacting with your website.
A good place to start is to create a lookalike audience of those people who completed a sale or conversion action on your site.
This is because these are the people that you would expect to be most interested in your product or service.
How does the Facebook Pixel work?
Your Facebook pixel is broken down into two segments. A base code and an event code. Your base code is what identifies your advertising account and will not change. You can generate this code from within the Facebook advertising platform.
The completion of a conversion action on your site is called an event. So, if someone clicks on your Facebook ad and then makes a purchase, this would be classed as an event.
You will need to create your own events which may require some development support depending on the method that you use.
There are two types of events, standard events and custom events.
Standard events
Facebook has predefined standard events. There are seventeen standard events that you can track:
- Add payment info
- Add to cart
- Contact
- Add to wish list
- Complete registration
- Customise product
- Donate
- Find location
- Initiate checkout
- Lead
- Purchase
- Schedule
- Search
- Start trial
- Submit application
- Subscribe
- View content
Custom events
Custom events are those events that are not specifically offered by Facebook. The user will need to create them themselves.
You can use custom events to build custom audiences. Unless the custom event is linked to a custom conversion, you cannot use a custom event for attribution or optimisation purposes.
Unlike the base code that needs to go on all pages of your website, The standard event code only needs to go on your site’s page that contains the action that you want to track as a conversion.
For example, if you want to track sales as a conversion action, you would add the relevant Standard event to the thankyou page to track it as a conversion.
How to install the Facebook Pixel
To create your Facebook pixel, click on Events Manager. From here, click on Connect data sources.

From the menu that appears, click on Web. Then, select Facebook Pixel.
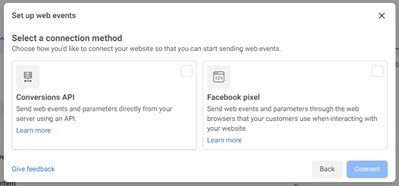
Once you’ve given your Facebook pixel a name, you will be given the option to either obtain the code and install the pixel yourself or use a partner integration.
Installing the pixel with a partner integration
Several platforms have developed a partner integration that greatly simplifies installing the Facebook pixel to your site. If you’re not a developer, then this option may be for you.
At the time of writing, there are twenty-five platforms that have integrated a process to install the Facebook pixel to your site automatically. Below is a table that shows this integration.
The process of installing your pixel with partner integration is slightly different for each partner. If you’re going to use a partner integration, select the relevant partner and follow the steps.
Manually installing the code
If you’re going to install the code yourself manually, click on Install Code Manually from the options menu. Select Copy Code.
This will copy your base code. This code needs to be added to all website pages just above the </head> tag. Once you’ve done this, press continue.
You will be given the opportunity to activate advanced matching. Advanced matching will pass additional information that your customers have given you over to Facebook.
Giving your pixel will make it more efficient and reduce the amount of time it takes to learn who your best customers are.
Next, you will need to define your events. You can either do this getting a developer to create some standard event tracking code for you or use Facebook’s event setup tool.
If you choose to use Facebook’s event setup tool, you will need to enter your website. Facebook will then open your website, and you can tell it what you want to track as an event.
If you choose to add the standard event code manually, then here is the code snippet that needs to be added for each standard event.
Wrapping up
Installing the Facebook pixel can seem daunting at first. However, it is a very powerful tool to help improve your Facebook advertising performance.
If you’re not using the Facebook pixel, you’re at a massive disadvantage compared to those advertisers who are using it.
Facebook has worked hard to simplify the process of creating and installing its pixel. Many CMS tools have also created tools to help with the Facebook pixel setup and standard events setup.
This means there is no excuse not to set up the Facebook pixel on your website.