8 ways to Use WordPress to Improve Google Ads PPC Advertising
Do you have a business that is using WordPress? Are you looking to promote it online using Google Ads PPC advertising? Well then, you’ve come to the right place.
In this blog, we’ll be looking at some ways you can use the power of WordPress to set up and get more out of your Google Ads advertising.
The Google Ads platform allows advertisers to get their business in front of millions of engaged users.
Advertisers can get their business in front of users searching on Google’s search engine, YouTube, Gmail, apps, Google Maps, and third-party websites that have opted to show AdSense ads on their website.
Before you can utilise the below tips, you’ll need a Google Ads PPC account, and a campaign set up. You can create a Google Ads account and your first campaign by going on the Google Ads page.

Tip 1: Set up Google Ads Conversion tracking to track meaningful website actions
Google Ads conversion tracking allows advertisers to see which keywords are securing meaningful actions on their website. Installing conversion tracking is vital to optimise and improve the performance of your Google Ads campaigns.
Conversion tracking can be used to track things such as form completions, clicks on a video, PDF downloads or people visiting a key page on your website, to name a few examples.
Without conversion tracking, PPC advertisers can see the number of impressions, clicks and cost that they’re accruing from each keyword. However, they can’t see which keyword is securing meaningful website interactions.
Below is an example of what you would be able to see within Google Ads without implementing conversion tracking:
There are many other metrics in Google Ads that you can look at. However, the cost per click and click-through rate are good starting points to see how well a keyword performs if you don’t have conversion tracking enabled.
If a keyword has a poor click-through rate, then this may be a sign that the keyword isn’t very relevant to the advertiser’s business. It may also signify that your ad copy needs to be improved as it is not catching the user’s eye.
The advertiser can look at the cost per click of their keywords. If the cost per click is too high, thmay indicate that the keyword isn’t going to be profitable.
Here is an example of what you would be able to see within Google Ads after implementing Google Ads conversion tracking: With conversion tracking implemented, you can see which keywords are leading towards meaningful results on their website.
In the above example, you can see which keywords are resulting in meaningful actions on a website.
For example, keyword one has a low click price, but it also has a poor conversion rate. As a result, it has a high cost per conversion.
On the other hand, keyword two has the highest cost per click, but its high conversion rate means it is bringing in the most cost-effective conversions.
Installing Google Ads conversion tracking with WordPress
Setting up conversion tracking requires creating a conversion action in Google Ads. Once this has been done, Google Ads will generate two pieces of code that need to be added to the website code. One way to add the code to your website is to use the Header Footer Code Manager plugin.
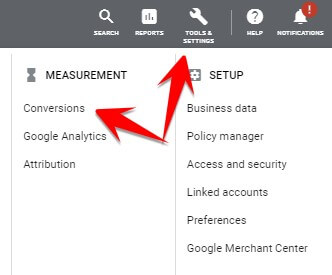
To generate a conversion action in Google Ads, click on Tools & Settings and then on Conversions.
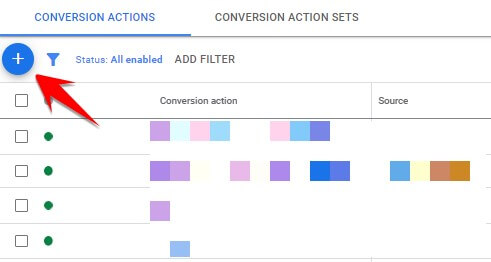
Click on the blue plus symbol to start creating a new conversion action
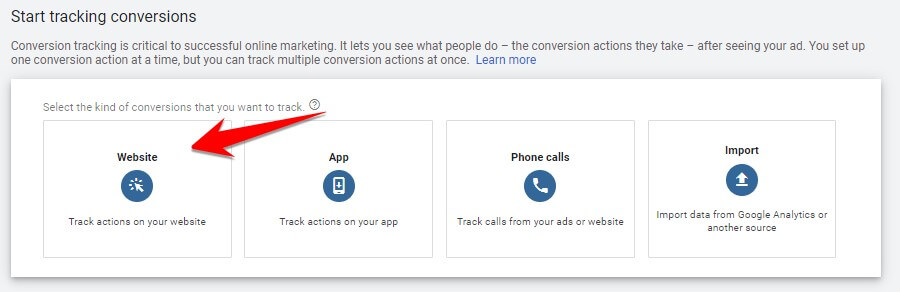
Select Website as you’re tracking an action:
Next, you will need to configure your conversion action. Select the category that your conversion action will be in and give it a name.
For the value, if you’re tracking leads and not sales, then select “Don’t use a value for this conversion action.”
You’ll most likely want to track one lead as one conversion regardless of the number of times that a single user completes a conversion action. If this is the case, then under the Count section, select ‘One’.
Next, you will be given two pieces of code. The global site tag needs to be added to all pages of the site. After a user completes your lead form, the event snippet needs to be added to the thank you page.
You can use the Header Footer Code Manager plugin to add both the code global site tag and the event snippet into the <head> sections of the relevant pages.
Tip 2: Set up Google Ads Conversion tracking to track revenue
If you want to use WordPress to sell products online, then you will need to install Woocommerce. WordPress was originally designed to be a blogging platform, but Woocommerce will transform it to showcase products and accept website purchases.
Woocommerce website owners can use Google Ads for conversion tracking as well as tracking purchases and revenue on their website.
The basic conversion tracking that Google Ads generates allows advertisers to track conversion actions. If you want to track the revenue from each conversion, then the code needs to be altered slightly. Luckily, WordPress has plugins that can significantly simplify the process of setting up conversion tracking.
Seeing how many sales each keyword has obtained allows PPC advertisers to optimise their bids by increasing bids on more profitable keywords and reducing bids on less profitable keywords. This should mean that you can get more sales and revenue from your PPC advertising budget.
Setting up Google Ads revenue tracking with WordPress
The process required to create a conversion action that tracks revenue is essentially the same as setting up a standard conversion action.
The only difference is that under the value section, you will select the ‘Use different values for each conversion’ option.
Once the conversion action is created in Google Ads, you will need a plugin to set things up for you on WordPress. A good plugin for implementing Google Ads conversion tracking that tracks sales and revenue is Woocommerce Pixel Manager By Woopt.
After installing the Woocommerce Pixel Manager by Woopt plugin, click on Wocommerce and then Woopt Pixel Manager.
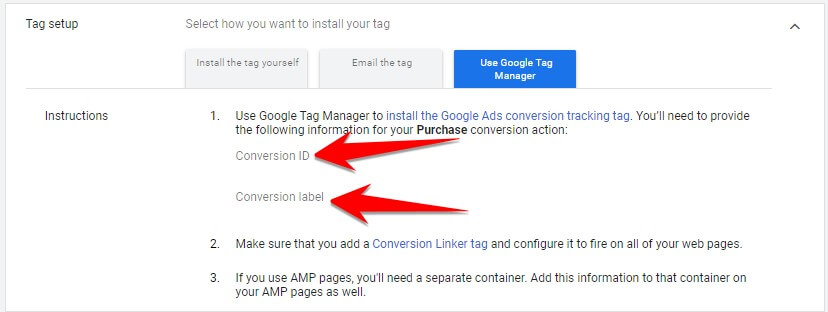
While in the Google menu, you will need to add the Google Ads conversion ID and the Google Ads conversion label.
To find the above required information, go back to the conversion tracking code generated by Google Ads.
You can find the conversion ID and conversion label in the below section. The codes have been removed from the image below:
Tip 3: Sync up Google Analytics
Google Analytics is a must-have free tool for online businesses. Whether they’re utilising PPC advertising or not. It allows advertisers to see a whole host of information on how users are interacting with their website.
One of the ways businesses using Google Ads advertising can benefit from Google Analytics is the ability to import various metrics from into Google Ads. These metrics are not available on Google Ads without syncing up Google Analytics.
Before you can start syncing up the additional metrics from Google Analytics into Google Ads, you will need to set up Google Analytics.
Setting up Google Analytics with WordPress
Luckily many plugins can help with the setup of Google Analytics with WordPress. Some popular to look into are Site Kit by Google, MonsterInsights – Google Analytics dashboard For WordPress and Woocommerce Google Analytics Integration.
While the setup process is slightly different for each plugin, the main piece of information that you will need to give the plugin is your Google Analytics account ID.
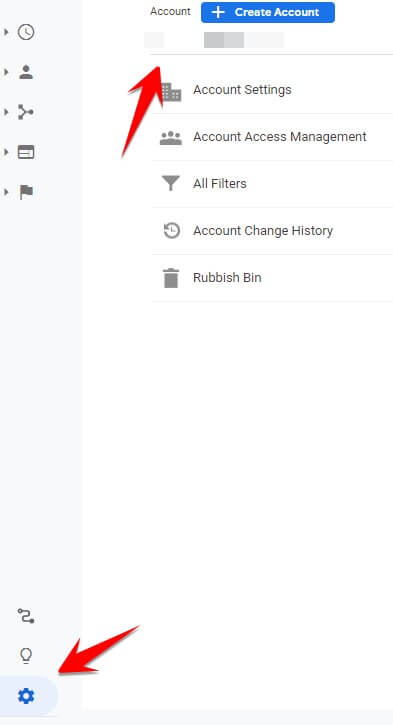
You can find this in Google Analytics by clicking on the Admin cog on the bottom left and then looking under the Account section.
Syncing Google Analytics to Google Ads
Once you have set up Google Analytics on your WordPress site, you can sync it up to your Google Ads account.
Syncing Google Analytics with your Google Ads account will allow you to get additional information on how your keywords are performing. These additional metrics can help you to determine the quality of the traffic that you’re bidding on.
- Bounce rate – The percentage of visits where the user left the site after only visiting the landing page.
- Pages/Session – The average number of pages that were viewed per Google Analytics session.
- Session Duration (seconds) – The average number of seconds spent on the website per Google Analytics session.
- Percentage of new sessions – The percentage of Google Analytics sessions that had never visited the site before.

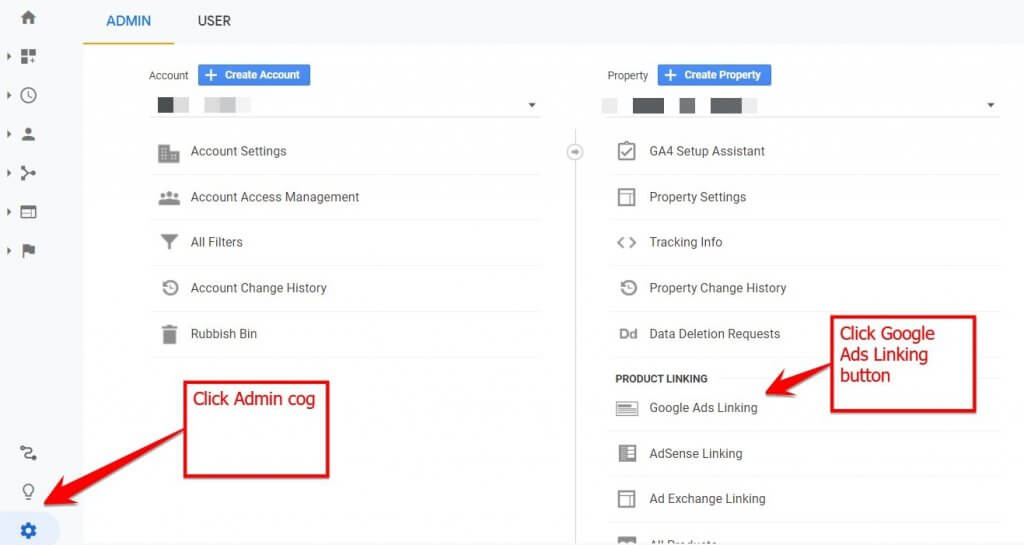
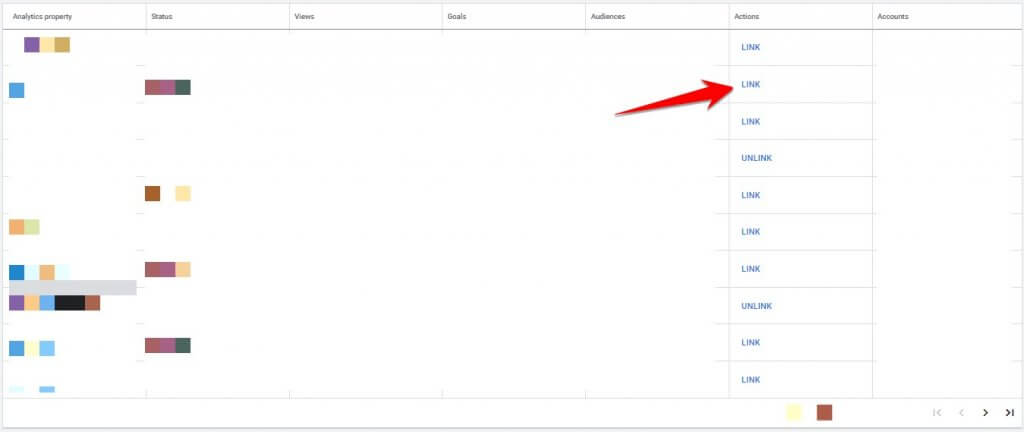
To start syncing up Google Analytics to Google Ads, you will need to click on the Admin cog and then on Google Ads Linking within your Google Analytics account.
As long as your Google Ads and Google Analytics accounts use the same email address, you should see the account ID of your Google Ads account here.
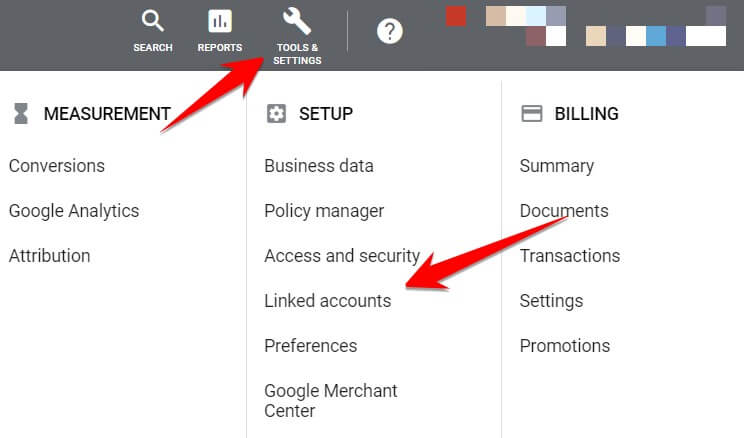
Once you have completed syncing within Google Analytics, you will need to go into Google Ads and finish the process. You can do this by clicking on Tools & Settings and then on Linked Accounts.
Click the Details button under Google Analytics.
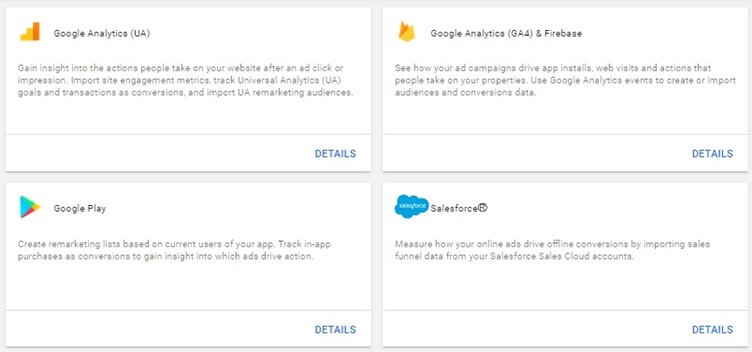
On the page that follows, you will see all the Google Analytics accounts that can be synced up to your Google Ads account. Find the relevant Google Analytics account and select Link.
Tip 4: Sync up a product feed
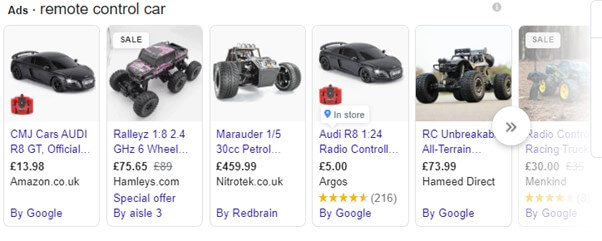
PPC advertisers that sell products online can utilise a Google Shopping campaign on Google Ads. With a Google Shopping campaign, a picture of your product, the product title and price appear when someone searches for a keyword that is relevant to your business.
E-commerce businesses often find that a Google Shopping campaign is the most profitable campaign type within their Google Ads account.
Before you can start creating a Google Shopping campaign within Google Ads, you will need to create a Google Merchant Centre account and add your product catalogue to it.
There are a few ways to do this, but in the long term, the smartest way is to sync up your WordPress site with Google Merchant Centre. This will mean that you won’t need to manually add new products, change stock information, pricing or product descriptions.
Luckily, both paid and free plugins are available on WordPress that can send a product feed over to Google Merchant Centre.
WordPress Plugins to send product feed to Google Merchant Centre
A few plugins available on WordPress can connect to Google Merchant Centre and automatically send your product feed. Most are free with a paid option.
Some of the popular plugins are Product Feed Pro For Wocommerce, Woocommerce Google Feed Manager, CTX Feed and ELEX Woocommerce Google Shopping (Google Product Feed).
Most product feed plugins on WordPress will give you a URL where your product feed is hosted on your site. You will need to add this URL to Google Merchant Centre during the setup process. This will tell Google Merchant Centre where to look to find your product feed.
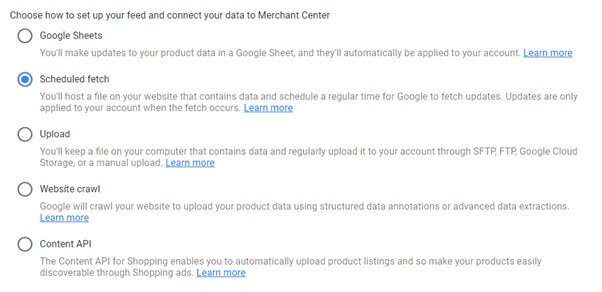
During the product feed syncing process in Google Merchant Centre, you will be presented with the options below. If your plugin has given you a URL where your product feed is stored, then choose the Scheduled Fetch option.
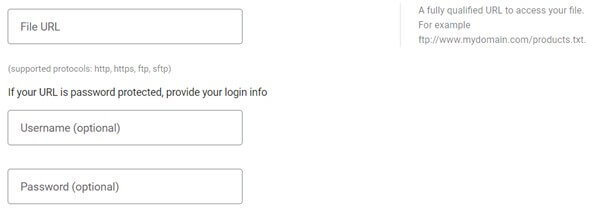
On the page that follows, you will need to add the URL where your product feed is stored and the username and password if it is password protected.
After following the remaining steps, your product feed should be synced up to Google Merchant Centre.
Tip 5: Dynamic Keyword injection on website
If you’ve been running Google Ads campaigns for a while, you’ll know that relevancy can improve the performance of your Google Ads account.
When ads contain the words that a user has searched for, and the general messaging is tailored to what they are searching for, then you should benefit from a higher click-through rate and better Quality Scores. Higher Quality Scores mean lower click prices.
Dynamic Keyword Injection on your website allows you to keep the messaging consistent from your ad through to the content on your website. Also, it allows you to change the text on your landing page based on what the user has searched for.
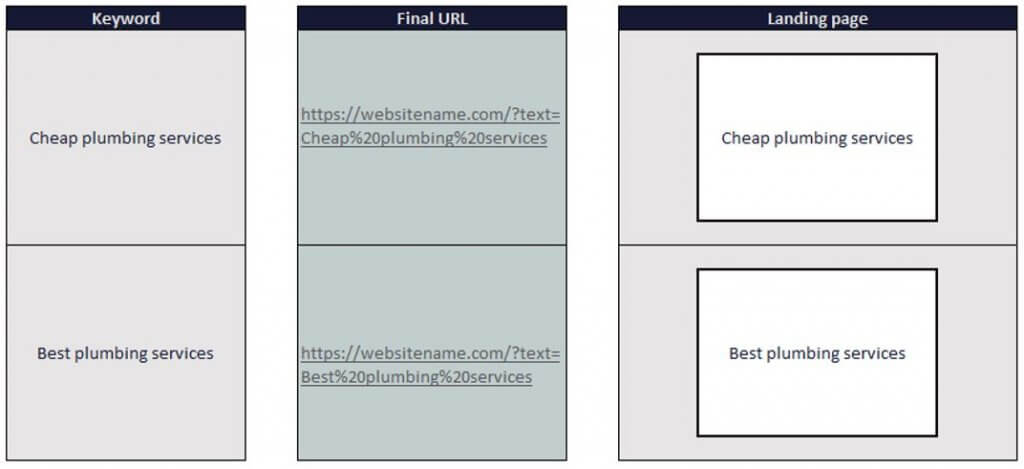
Dynamic keyword injection works by taking the text that you add to your Google Ads final URL. So, for each keyword that you want to use dynamic keyword injection, you would add your text into the Final URL.
https://websitename.com/?text=Cheap%20plumbing%20services
In the below example, we can tailor the text on the landing page based on whether the cheap plumbing services or the best plumbing services keyword is triggered.
Plugin to set up Dynamic Keyword Injection with WordPress
A popular and free plugin on WordPress that allows you to use the Keyword Injection feature is WP Dynamic Keywords Injector.
Tip 6: Sticky add to cart
A sticky add to cart button can make the add to cart button appear on the product page even when the user is scrolling down the page.
The constant presence of the add to cart button may help to persuade the user to purchase on your site. This can improve the conversion rate of your site and make your Google Ads PPC campaigns more profitable.
Improving the conversion rate of your PPC campaigns will increase the number of sales and the level of returns that you obtain from PPC advertising.
Sticky add to cart WordPress plugins
There are several sticky add to cart plugins available on WordPress, from paid options to free ones.
Take a look at Sticky Add To Cart Bar For Woocommerce, Simple Sticky Add To Cart For Woocommerce, and Sticky add to cart for Woocommerce.
Depending on the plugin that you choose, some will allow you to change the colour of the sticky add to cart banner, the colour of the add to cart button and whether you want to show a picture of the product on the banner or not.
Tip 7: Upload email list
Google Ads allows for email lists to be uploaded into the platform. Once an email list has been uploaded into Google Ads, advertisers can target those users differently.
They may choose to use a different ad copy for users who fall in that email list or bid more/less when someone from the email list searches for one of their keywords.
Uploading a customer list into Google Ads doesn’t require a plugin. It is another example of how using the data in WordPress can improve your Google Ads PPC campaigns.
Google Doesn’t allow all advertisers to upload a customer match list, so you will need to check if your account is eligible to use this feature.
To be able to upload an email list into Google Ads, your account must satisfy the below criteria:
- A good history of policy compliance.
- A good payment history.
- At least 90 days’ history in Google Ads.
- More than $50,000 spent in the lifetime of the account .
How to upload an email list into Google Ads
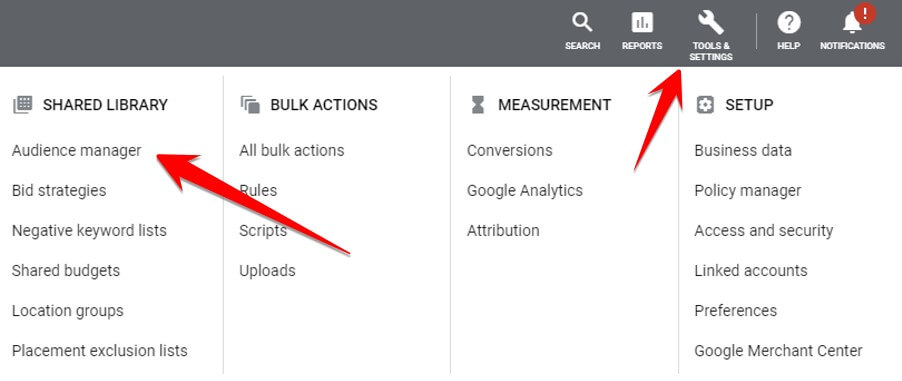
To upload an email list into Google Ads, click on ‘Tools & Settings and then on ‘Audience Manager’. From here, you will be able to access all the audiences that you have created.
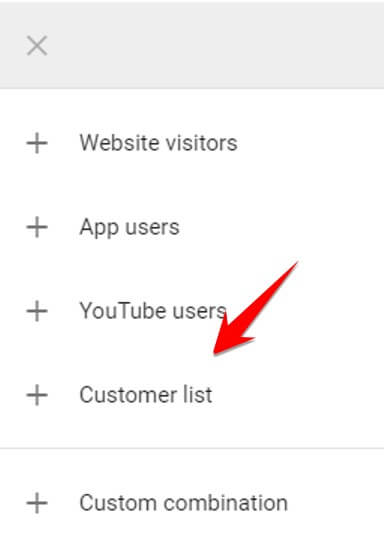
Click on the blue + symbol and then on ‘Customer list’.
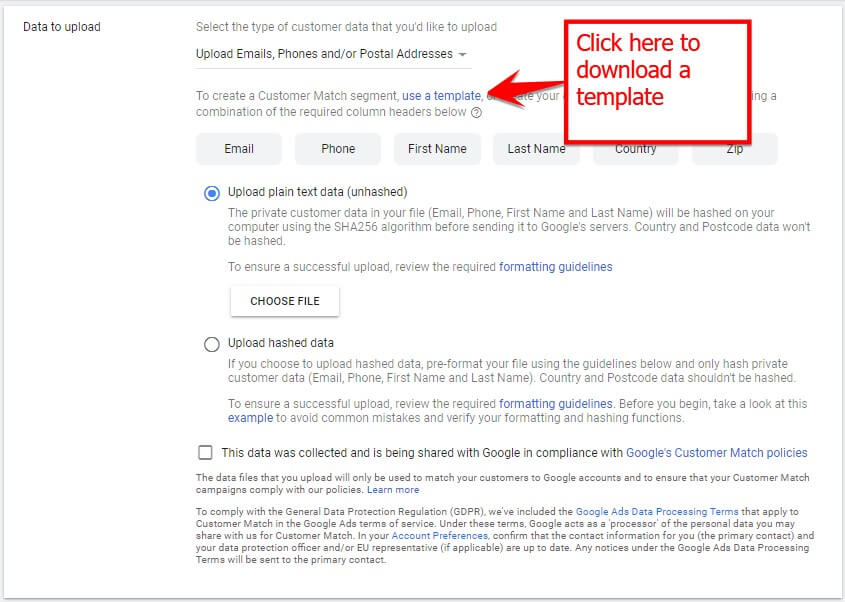
On the page that follows, you will be able to upload your email list. If your data is not hashed, then select ‘Upload plain text data(unhashed). This will apply SHA256 encryption to the data that you upload.
You now have an email list uploaded into Google Ads.
Tip 8: Identify new keywords with Google Search Console
If you thought that Google Search Console is a tool that can only be used for SEO purposes, then you thought wrong.
Google Search console can show what keywords your website is appearing for on organic (non-paid) listings on Google’s search engine. For PPC advertisers, it can be an excellent way to find new keyword opportunities that you’re not currently targeting.

How to use Google Search Console for PPC advertising
Google Search Console can show the number of times your organic listing appeared on a search results page. This can help you to identify relevant keyword opportunities to bid on that have a decent amount of volume
Another popular tactic is using Google Search Console to identify keywords that appear on position one organically and don’t have any paid competition.
For these keywords, there is no need to pay for clicks via a PPC campaign as you already appear on the top of the page organically.
Similarly to not bidding on keywords where you appear on position one organically, there may be some keywords that are very competitive on organic listings.
You may appear very low on the page, or you may not even appear on the first page. You can pick up traffic from these keywords using a PPC campaign.
WordPress Plugin that can help with Google Search Console setup
To use Google Search console, a piece of code generated by Google Search Console needs to be added to your website.
However, there are several free plugins available on WordPress that can simplify the setup of Google Search Console.
If you want a basic WordPress Plugin to help connect Google Search Console to your website, try the Search Console plugin.
Alternatively, the Site Kit by Google plugin allows you to connect Google Analytics, Search Console, AdSense and Google Pagespeed insights, all with just one plugin.
Wrapping up
There are many factors that go into crafting a successful and profitable PPC campaign. While there is much more to PPC advertising, the above eight tips should go a long way towards helping you to take advantage of the plugins on the WordPress platform to get the most out of your Google Ads PPC advertising campaigns.